Tuesday, February 4, 2014

Citi Card Virtual Account Numbers (VAN) Application Outdated?

Skip the narrative and jump directly to the solution.

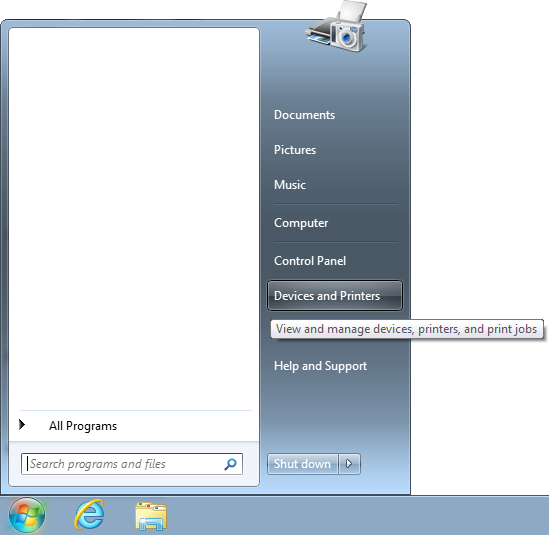
As a follow up to a prior article on Citi Card Virtual Account Numbers nightmare (see Citi Card Virtual Account Number (VAN) Error Code 1031), here is a new issue some people have encountered recently. The latest Citi VAN application had allegedly been causing some browser cache corruption and making the application unusable. The easiest way to solve this problem is to uninstall the application, clear browser cache, and reinstalling the Citi VAN application.

However, after downloading the latest version of Citi VAN and reinstalling it, an error is displayed when the application is launched stating "Please note that the current version of Virtual Account Numbers you are attempting to access is outdated. Please visit Account Online to download the latest version of Virtual Account Numbers."

Citi VAN Outdated Error

Now wait a minute, isn't this the application that was just downloaded from the Citi Cards web site and installed? How could it be outdated already? Before you go clicking on that link and go through the uninstall / download / installation process again, allow me to spare you the agony of this endless loop.

First of all, you have to realize that the application isn't lying to you. There is indeed a newer version of Citi VAN. It's just that the Accounts Online site, for some strange and unknown reason, isn't sending you the latest version when you click on the download link. The current version that can be downloaded is 4.0.0.2239, dated Friday, July 19, 2013, 11:42:14 AM (see image on the left below) yet the latest version is 4.0.0.2248 dated Wednesday, October 09, 2013, 08:34:08 AM (see image on the right).

Citi VAN Version 4.0.0.2239 Details Citi VAN Version 4.0.0.2248 Details

 
In order to install the newest version (4.0.0.2248), you will have to find a friend who had saved the setup.exe file. Or, you can download it from here:

Citi VAN Setup Version 4.0.0.2248

WARNING: The file linked above is property of its respective owner(s). This blog does not claim ownership of the file. This file is provided on an as is basis. No guarantees or warranties are given or implied. Downloading this file is free of charge and the user assumes all risks of any damages that may occur, including but not limited to loss of data, damages to hardware, or loss of business profits. It is suggested that you do a virus scan using an up-to-date version of an anti-virus program (Such as Norton, McAfee, or VirusTotal) before using the file. Please use at your own risk.

Friday, August 30, 2013

Citi Card Virtual Account Number (VAN) Error Code 1031

Skip the Intro and jump directly to the solution.

If you possess any MasterCard issued by Citi you would be aware of their wonderful fraud prevention feature called the Virtual Account Number (also popularly known as Citi VAN). This is a free service provided by Citi that allows the user of the credit card to generate a unique credit card number that is different from the original physical card yet is internally linked to the same account so when you make a purchase online, you don't have to give out your real credit card number. The service also enables you to set the maximum amount the charge is allowed and the expiration date for the generated card number. For detailed features and benefits of this security feature (which is beyond the scope of this article), visit the Virtual Account Numbers page at https://www.citibank.com/us/cards/gen-content/messages/van/. Lately there have been reports of errors when using the Citi Virtual Account Number tool. Namely the infamous 1031 error given when trying to log in to the service. The error reads (see image below):
We've encountered a problem processing your request. For assistance, please call Customer Service at the number on the back of your card and mention Error Code 1031.

Citi Virtual Account Number (VAN) Error Code 1031
The dreaded 1031 error when logging into the Citi Virtual Account Number tool.

You, too probably had your share of such frustrating encounters with the Virtual Account Number tool. The most unfortunate thing is, if you were to follow the instruction given in the error message and call their customer service number, you would get a standard response that this error occurred due to a change in your contact information (even if you did not change your contact information) and it would take TWO WEEKS for them to reset the information before you can use the service again! This standard response can be especially infuriating when you are in your final step of an online order and need to enter a credit card number for payment to complete the purchase. When inquired about what to do in such a situation, the customer service representative actually suggested to enter the real credit card number. Isn't it the original idea of this tool NOT to give out the real card number in order to keep it safe???

Interestingly, there is a pattern to this madness. And, fortunately, there is a quicker and simpler solution to this problem without requiring the two-week waiting period. Basically, instead of having the customer service representative reset your contact information, simply make a minor change to your profile online and have the reset triggered automatically. After making the change, you will generally be able to use your Virtual Account Number tool within 24 hours.
 
Here are the step by step instructions (You will need to have your card with you because you will be prompted to enter the three-digit security code on the card on the last step of this process):

  1. Log in to your Citi account by going to https://www.citi.com/ and select Credit Cards under the Sign On To Your Account box.


  2. Type in your User ID and Password and click on Sign On to get into your account.


  3. Once you are signed on to your account, click on the My Profile link on top of the page.


  4. In the My Profile page, look for the Edit Contact Information link under the My Communications sub category.


  5. Your address(es) and phone number(s) will be displayed. Click on the Make Changes link towards to upper right hand corner of the page.


  6. Scroll down to the phone number section and make a change to your primary phone number to another phone number you have. (Or, simply switch around your Home phone, Work Phone, and Mobile phone numbers. If you only have one phone number, change it to something else and then immediately go back to Step 5 and change it back to your number again.) You will need to enter the three-digit security code from your card and then click on the Save Changes link towards the upper right hand corner of the page.


That’s it and you are done. Wait a few hours and try to log in to Virtual Account Number. It usually works within 24 hours. Much better than waiting two weeks!

Thursday, May 31, 2012

Missing or Garbled / Jumbled Text When Using Adobe PDF Printer in Internet Explorer 9

Have you ever encountered this problem when printing to PDF from Internet Explorer and the generated PDF file contains text that are all but unreadable? This might be a very frustrating, and sometimes infuriating experience (for instance, when you are trying to print the receipt of an online purchase for your records) If so, do not despair, you are not a victim of some strange virus. Instead, you are a victim of obfuscated embedded fonts provided by the Windows XPS printing engine.

Fortunately, this is a documented issue (both by Adobe and Microsoft) and there's a simple solution to this problem.

To have Adobe PDF Printer print correctly, you will need to set the printer to use document fonts. Here are the steps to make the change to your Adobe PDF Printer settings.

1. Open up Devices and Printers.


2. Select the Adobe PDF Printer.


3. Open up the Printing Preferences dialog box by right-clicking the Adobe PDF Printer and selecting Printing Preferences from the context menu.


4. Select the Adobe PDF Settings tab on top of the Adobe PDF Printing Preferences dialog box.


5. Make sure the Rely on system fonts only; do not use document fonts option is NOT checked.


6. Click on the OK button and print away!


Friday, May 18, 2012

Performance Test of the Patriot Signature 32 GB microSDHC Class 4 Flash Memory Card (PSF32GMCSDHC43P)

A local retailer had a sale that made the price of the Patriot Signature 32 GB microSDHC Class 4 Flash Memory Card quite attractive.


However, after a quick search, it was apparent that this card it not a fast-performance product. In fact, some reviews suggest rather poor performances under certain circumstances (e.g. adapter issues). Since the price was so good, we've decided to take the plunge and purchase one to test ourselves.


After testing the memory card with different adapters, it seems like the card has an acceptable performance for sequential read and write (14.828 MB/s and 4.976 MB/s respectively). However, the card performed poorly on random read / write tests (about 3.4 MB/s for reads and 0.1 MB/s for writes). Furthermore, the type of microSD to SD adapter used does not affect the performance significantly.


For comparison purposes, the speed test results of a Kingston 2 GB microSD (made in Taiwan) card and a Samsung 2 GB microSD card were obtained. The Kingston card had a slightly better read performance than the Patriot card. However, the write performance was worse. The Samsung card had the worst read speed.


For the raw data, see the spreadsheet below:


Tests were performed using a Sony Vaio VGN-FZ485U laptop with Intel Core2 Duo T8100 CPU at 2.1 GHz, 4 GB of memory, running Windows 7 Enterprise Service Pack 1. The USB card reader used is the Siyoteam SY-568 USB 2.0 All in One Card Reader.

Thursday, April 12, 2012

Yahoo! IMAP Syncing Issue


Yahoo! has just sent out an email acknowledging a syncing issue they were having with their IMAP service. Here's the message they sent out to the affected users:

Dear Yahoo! Mail User,
This is regarding your Yahoo! Mail account with the ID [omitted]. At Yahoo!, ensuring the safety and security of your data is important to us, and we know how critical your email is to you. We recently experienced an issue syncing emails for some of our users when accessing email from an IMAP device like an iPhone or an Android phone. Emails that you might have moved from your inbox to folders (including the trash folder) may have been temporarily unavailable. We fixed this issue, and recovered emails that may not have been synced to the right folder. 
This is what you can expect to see:
- We have automatically added a folder called "Synced Messages" to your email account today located in the left navigation of your inbox. 
- Our systems identified emails that may have been subject to the syncing issue and added them to the "Synced Messages" folder. 
This is what you should do:
- Open the "Synced Messages" folder and move any messages you wish to keep to the inbox or your other personal folders. 
- After you move the messages you wish to keep, you can delete the remaining messages in "Synced Messages" folder as well as the folder itself. The "Synced Messages" folder will remain in your account until you delete it. 
At Yahoo!, we strive to give you the best email experience possible. We apologize that some email was not synced properly, and please know that this issue has been fixed. 
If you have any questions, please visit our help pages where you can find more information:
http://help.yahoo.com/l/us/yahoo/mail/ymail/known_issues/mltasynciss.html 
Kind regards, 
The Yahoo! Mail team

Saturday, March 31, 2012

Accessing Yahoo! Business Email on Android Devices Using IMAP

You are in luck if you want to use your Android device (tablet or smart phone) to access your cloud based email account. For virtually any major email provider, there's an app that you can find in Google Play (formerly Android Market) that will serve the specific purpose of accessing their service. However, there is also a generic Android Email app that comes with the OS that can be used if you do not wish to use the specialized apps. For instance, running Yahoo! Mail app on a low end Android phone can be excruciatingly slow. Worse yet, it's virtually impossible if you want to access your Yahoo! Business Email account (those with the company's domain name instead of yahoo.com) using the Yahoo! Mail app.
The Email app in Android is a good and free app that allows you to access Yahoo! Business Email. The only disadvantage of Android Mail is that it does not support push mail. So you’ll have to set it to check mail at a regular interval. To set up your Email app, you will need the following information (step-by-step direction will follow):
  • Incoming Mail (also known as IMAP in technical terms):
    • Server: imap.mail.yahoo.com
    • Port: 993
    • Security: SSL
  • Outgoing Mail (also known as SMTP):
    • Server: smtp.bizmail.yahoo.com
    • Port: 465
    • Security: SSL
Now, onto the step-by-step direction:
  1. Tap on the menu button at the bottom of your screen.
  2. Tap on Email (the default Android Email, not any other email app like Gmail or Yahoo mail).
  3. Click the Menu button at the bottom of your phone (often it is a physical button outside of the screen on the very left hand side).
  4. Tap on Add Account.
  5. Select Others for account type.
  6. Enter your email address and password then tap on Manual Setup (DO NOT tap on Next).
  7. Select IMAP when prompted for account type.
  8. Enter the following information for Incoming server settings then tap Next:
    • Username:(Your complete email account, including the domain name.)
    • Password:(Your password)
    • IMAP server: imap.mail.yahoo.com
    • Port: 993
    • Security type: SSL
    • IMAP path prefix: (Leave this blank.)
  9. Enter the following information for Outgoing server settings then tap Next:
    • SMTP server: smtp.bizmail.yahoo.com
    • Port: 465
    • Security type: SSL
    • Require sign-in: checked
    • Username: (Your complete email account, same as in the previous step.)
    • Password: (Your password.)
  10. Under Email checking frequency, set it to how often you would like mail to be checked (it does not support push mail so you will not get messages immediately). Make sure the checkbox next to Notify me when email arrives is checked then tap on Next.
  11. Give the account a nickname and tap on Done.
That’s it for accessing your Yahoo! Business Email account on Android devices.

Accessing Yahoo! Business Email on iOS Devices Using IMAP

Now that you've got your new iPad and have gotten all of your music and games loaded, it's time to get productive with the device. You start setting up your email access and soon realized that, unlike Android devices, the Apple App Store does not have an app for Yahoo Mail! Then you remembered that iOS 5 includes a default Mail app that allows you to access the most popular cloud based email accounts. So you start going through the settings and soon realize that, although it's easy to set up for the free Yahoo mail, it's impossible to set up the Mail app to access your Yahoo! Business Email. How could this be? Isn't the reason you use Apple products because "it just works?"
Fortunately, there is a way to set up the Mail app to access Yahoo! Business Email. In techie's terms it's called going through IMAP (Internet Message Access Protocol). All you need are the IMAP parameters and some patience to go through a few easy steps.

Here are the basic information you will need to set things up. For those who are technically savvy, this is all you need. Otherwise, read on for the step-by-step direction.
Incoming Mail (also known as IMAP in technical terms):
  • Server: imap.mail.yahoo.com
  • Port: 993
  • Security: SSL
Outgoing Mail (also known as SMTP):
  • Server: smtp.bizmail.yahoo.com
  • Port: 465
  • Security: SSL
Now for the step-by-step direction:
  1. Go to Settings, select Mail, Contacts, Calendars and tap on Add Account....
  2. In selecting the type of account, DO NOT select Yahoo!, but instead select Other.
  3. Tap on Add Mail Account under the Mail section.
  4. Enter your Name, Email, Password, and a short description (this is what shows up in the list of accounts when you go to Mail later on) for this account then tap on Next.
    • Name (Your name)
    • Email (Your email address)
    • Password (Your password)
    • Description (A short description for this account, this is what shows up in the list of accounts when you go to Mail)
  5. On the next screen, make sure IMAP is highlighted on top and then enter the following:
    • Incoming Mail Server
      • Host Name: imap.mail.yahoo.com
      • User Name: youremail@yourdomain.com (make sure you enter the entire email address here)
      • Password: your password
    • Outgoing Mail Server
      • Host Name: smtp.bizmail.yahoo.com
      • User Name: youremail@yourdomain.com (make sure you enter the entire email address here)
      • Password: your password
  6. On the next screen, turn off Notes because Yahoo does not support synchronization of notes.
  7. Tap on Save and you should be set to receive messages on your device.
  8. Once your mail is set, you can make a few fine adjustments to the settings to make sure messages you send from your device will show up in your Yahoo mail on the web. To do this, go back to Settings, select Mail, Contacts, Calendars again and tap on the account you just created (the account name is whatever you entered in the Description field in step 4 above).
  9. Tap on your email account.
  10. Go to the bottom and tap on Advanced.
  11. Under the Mailbox Behaviors section, tap on Drafts Mailbox.
  12. Select Draft under the On the Server section. (If it’s set to Drafts under On My iPad, your drafts will stay on your iPad and you will not see them on the Yahoo web site.) If you do not see the On the Server section, you might have to open up your mailbox first to have Yahoo tell your device which folders there are in your account. To do this, go to iPad Mail and under Accounts, select your Yahoo account. This will bring the data in and then you can go back to this step under settings.
  13. Similarly, tap on Sent Mailbox and select Sent from the On the Server section.
  14. Do the same thing for Deleted Mailbox and set it to Trash under the On the Server section.
  15. Now go down to the Incoming Settings section and turn on Use SSL. This will make sure the messages are delivered to you securely (prevent hackers from seeing your messages).
If you want your messages delivered to you immediately, double check to make sure that Push Mail is enabled. Other options for mail delivery are: Fetch on Schedule and Fetch Manually. Push Mail just means that Yahoo will notify your device as soon as a new message is received. Fetch on Schedule means your device will ask Yahoo every so often whether new messages are available. Fetch Manually means there’s no automatic check for new messages (this is useful for those who want to save on the cost of data plans).

To enable Push Mail:

  1. Go to Settings, select Mail, Contacts, Calendars and tap on Fetch New Data.
  2. Turn on Push if it’s not on already.
  3. Tap on Advanced
  4. Select your Yahoo account and set the option to Push (or whatever method suits you).

That's it for setting up your Yahoo! Business Email on your iOS device!