Thursday, May 31, 2012

Missing or Garbled / Jumbled Text When Using Adobe PDF Printer in Internet Explorer 9

Have you ever encountered this problem when printing to PDF from Internet Explorer and the generated PDF file contains text that are all but unreadable? This might be a very frustrating, and sometimes infuriating experience (for instance, when you are trying to print the receipt of an online purchase for your records) If so, do not despair, you are not a victim of some strange virus. Instead, you are a victim of obfuscated embedded fonts provided by the Windows XPS printing engine.

Fortunately, this is a documented issue (both by Adobe and Microsoft) and there's a simple solution to this problem.

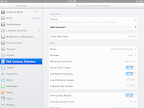
To have Adobe PDF Printer print correctly, you will need to set the printer to use document fonts. Here are the steps to make the change to your Adobe PDF Printer settings.

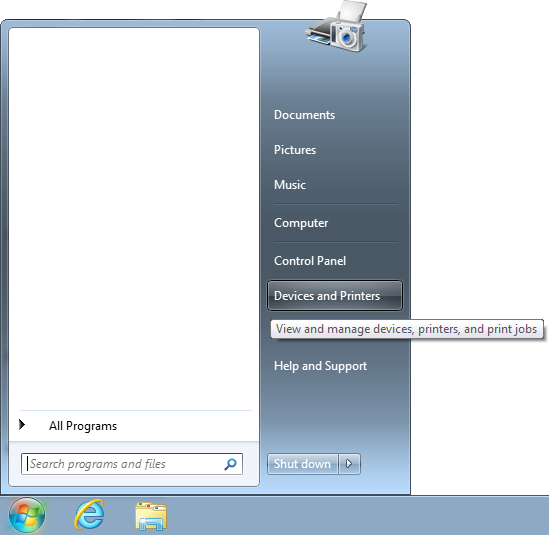
1. Open up Devices and Printers.


2. Select the Adobe PDF Printer.


3. Open up the Printing Preferences dialog box by right-clicking the Adobe PDF Printer and selecting Printing Preferences from the context menu.


4. Select the Adobe PDF Settings tab on top of the Adobe PDF Printing Preferences dialog box.


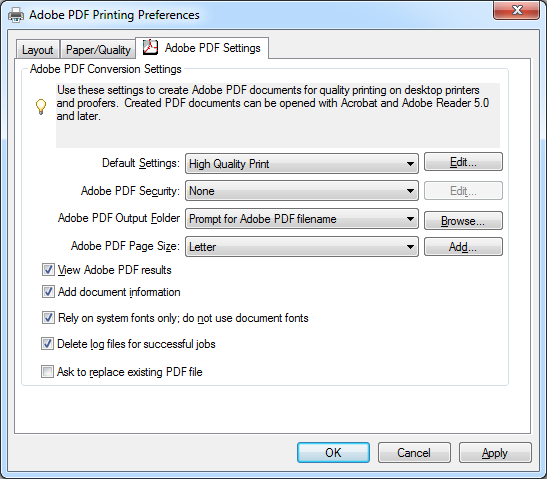
5. Make sure the Rely on system fonts only; do not use document fonts option is NOT checked.


6. Click on the OK button and print away!


Friday, May 18, 2012

Performance Test of the Patriot Signature 32 GB microSDHC Class 4 Flash Memory Card (PSF32GMCSDHC43P)

A local retailer had a sale that made the price of the Patriot Signature 32 GB microSDHC Class 4 Flash Memory Card quite attractive.


However, after a quick search, it was apparent that this card it not a fast-performance product. In fact, some reviews suggest rather poor performances under certain circumstances (e.g. adapter issues). Since the price was so good, we've decided to take the plunge and purchase one to test ourselves.


After testing the memory card with different adapters, it seems like the card has an acceptable performance for sequential read and write (14.828 MB/s and 4.976 MB/s respectively). However, the card performed poorly on random read / write tests (about 3.4 MB/s for reads and 0.1 MB/s for writes). Furthermore, the type of microSD to SD adapter used does not affect the performance significantly.


For comparison purposes, the speed test results of a Kingston 2 GB microSD (made in Taiwan) card and a Samsung 2 GB microSD card were obtained. The Kingston card had a slightly better read performance than the Patriot card. However, the write performance was worse. The Samsung card had the worst read speed.


For the raw data, see the spreadsheet below:


Tests were performed using a Sony Vaio VGN-FZ485U laptop with Intel Core2 Duo T8100 CPU at 2.1 GHz, 4 GB of memory, running Windows 7 Enterprise Service Pack 1. The USB card reader used is the Siyoteam SY-568 USB 2.0 All in One Card Reader.

Thursday, April 12, 2012

Yahoo! IMAP Syncing Issue


Yahoo! has just sent out an email acknowledging a syncing issue they were having with their IMAP service. Here's the message they sent out to the affected users:

Dear Yahoo! Mail User,
This is regarding your Yahoo! Mail account with the ID [omitted]. At Yahoo!, ensuring the safety and security of your data is important to us, and we know how critical your email is to you. We recently experienced an issue syncing emails for some of our users when accessing email from an IMAP device like an iPhone or an Android phone. Emails that you might have moved from your inbox to folders (including the trash folder) may have been temporarily unavailable. We fixed this issue, and recovered emails that may not have been synced to the right folder. 
This is what you can expect to see:
- We have automatically added a folder called "Synced Messages" to your email account today located in the left navigation of your inbox. 
- Our systems identified emails that may have been subject to the syncing issue and added them to the "Synced Messages" folder. 
This is what you should do:
- Open the "Synced Messages" folder and move any messages you wish to keep to the inbox or your other personal folders. 
- After you move the messages you wish to keep, you can delete the remaining messages in "Synced Messages" folder as well as the folder itself. The "Synced Messages" folder will remain in your account until you delete it. 
At Yahoo!, we strive to give you the best email experience possible. We apologize that some email was not synced properly, and please know that this issue has been fixed. 
If you have any questions, please visit our help pages where you can find more information:
http://help.yahoo.com/l/us/yahoo/mail/ymail/known_issues/mltasynciss.html 
Kind regards, 
The Yahoo! Mail team

Saturday, March 31, 2012

Accessing Yahoo! Business Email on Android Devices Using IMAP

You are in luck if you want to use your Android device (tablet or smart phone) to access your cloud based email account. For virtually any major email provider, there's an app that you can find in Google Play (formerly Android Market) that will serve the specific purpose of accessing their service. However, there is also a generic Android Email app that comes with the OS that can be used if you do not wish to use the specialized apps. For instance, running Yahoo! Mail app on a low end Android phone can be excruciatingly slow. Worse yet, it's virtually impossible if you want to access your Yahoo! Business Email account (those with the company's domain name instead of yahoo.com) using the Yahoo! Mail app.
The Email app in Android is a good and free app that allows you to access Yahoo! Business Email. The only disadvantage of Android Mail is that it does not support push mail. So you’ll have to set it to check mail at a regular interval. To set up your Email app, you will need the following information (step-by-step direction will follow):
  • Incoming Mail (also known as IMAP in technical terms):
    • Server: imap.mail.yahoo.com
    • Port: 993
    • Security: SSL
  • Outgoing Mail (also known as SMTP):
    • Server: smtp.bizmail.yahoo.com
    • Port: 465
    • Security: SSL
Now, onto the step-by-step direction:
  1. Tap on the menu button at the bottom of your screen.
  2. Tap on Email (the default Android Email, not any other email app like Gmail or Yahoo mail).
  3. Click the Menu button at the bottom of your phone (often it is a physical button outside of the screen on the very left hand side).
  4. Tap on Add Account.
  5. Select Others for account type.
  6. Enter your email address and password then tap on Manual Setup (DO NOT tap on Next).
  7. Select IMAP when prompted for account type.
  8. Enter the following information for Incoming server settings then tap Next:
    • Username:(Your complete email account, including the domain name.)
    • Password:(Your password)
    • IMAP server: imap.mail.yahoo.com
    • Port: 993
    • Security type: SSL
    • IMAP path prefix: (Leave this blank.)
  9. Enter the following information for Outgoing server settings then tap Next:
    • SMTP server: smtp.bizmail.yahoo.com
    • Port: 465
    • Security type: SSL
    • Require sign-in: checked
    • Username: (Your complete email account, same as in the previous step.)
    • Password: (Your password.)
  10. Under Email checking frequency, set it to how often you would like mail to be checked (it does not support push mail so you will not get messages immediately). Make sure the checkbox next to Notify me when email arrives is checked then tap on Next.
  11. Give the account a nickname and tap on Done.
That’s it for accessing your Yahoo! Business Email account on Android devices.

Accessing Yahoo! Business Email on iOS Devices Using IMAP

Now that you've got your new iPad and have gotten all of your music and games loaded, it's time to get productive with the device. You start setting up your email access and soon realized that, unlike Android devices, the Apple App Store does not have an app for Yahoo Mail! Then you remembered that iOS 5 includes a default Mail app that allows you to access the most popular cloud based email accounts. So you start going through the settings and soon realize that, although it's easy to set up for the free Yahoo mail, it's impossible to set up the Mail app to access your Yahoo! Business Email. How could this be? Isn't the reason you use Apple products because "it just works?"
Fortunately, there is a way to set up the Mail app to access Yahoo! Business Email. In techie's terms it's called going through IMAP (Internet Message Access Protocol). All you need are the IMAP parameters and some patience to go through a few easy steps.

Here are the basic information you will need to set things up. For those who are technically savvy, this is all you need. Otherwise, read on for the step-by-step direction.
Incoming Mail (also known as IMAP in technical terms):
  • Server: imap.mail.yahoo.com
  • Port: 993
  • Security: SSL
Outgoing Mail (also known as SMTP):
  • Server: smtp.bizmail.yahoo.com
  • Port: 465
  • Security: SSL
Now for the step-by-step direction:
  1. Go to Settings, select Mail, Contacts, Calendars and tap on Add Account....
  2. In selecting the type of account, DO NOT select Yahoo!, but instead select Other.
  3. Tap on Add Mail Account under the Mail section.
  4. Enter your Name, Email, Password, and a short description (this is what shows up in the list of accounts when you go to Mail later on) for this account then tap on Next.
    • Name (Your name)
    • Email (Your email address)
    • Password (Your password)
    • Description (A short description for this account, this is what shows up in the list of accounts when you go to Mail)
  5. On the next screen, make sure IMAP is highlighted on top and then enter the following:
    • Incoming Mail Server
      • Host Name: imap.mail.yahoo.com
      • User Name: youremail@yourdomain.com (make sure you enter the entire email address here)
      • Password: your password
    • Outgoing Mail Server
      • Host Name: smtp.bizmail.yahoo.com
      • User Name: youremail@yourdomain.com (make sure you enter the entire email address here)
      • Password: your password
  6. On the next screen, turn off Notes because Yahoo does not support synchronization of notes.
  7. Tap on Save and you should be set to receive messages on your device.
  8. Once your mail is set, you can make a few fine adjustments to the settings to make sure messages you send from your device will show up in your Yahoo mail on the web. To do this, go back to Settings, select Mail, Contacts, Calendars again and tap on the account you just created (the account name is whatever you entered in the Description field in step 4 above).
  9. Tap on your email account.
  10. Go to the bottom and tap on Advanced.
  11. Under the Mailbox Behaviors section, tap on Drafts Mailbox.
  12. Select Draft under the On the Server section. (If it’s set to Drafts under On My iPad, your drafts will stay on your iPad and you will not see them on the Yahoo web site.) If you do not see the On the Server section, you might have to open up your mailbox first to have Yahoo tell your device which folders there are in your account. To do this, go to iPad Mail and under Accounts, select your Yahoo account. This will bring the data in and then you can go back to this step under settings.
  13. Similarly, tap on Sent Mailbox and select Sent from the On the Server section.
  14. Do the same thing for Deleted Mailbox and set it to Trash under the On the Server section.
  15. Now go down to the Incoming Settings section and turn on Use SSL. This will make sure the messages are delivered to you securely (prevent hackers from seeing your messages).
If you want your messages delivered to you immediately, double check to make sure that Push Mail is enabled. Other options for mail delivery are: Fetch on Schedule and Fetch Manually. Push Mail just means that Yahoo will notify your device as soon as a new message is received. Fetch on Schedule means your device will ask Yahoo every so often whether new messages are available. Fetch Manually means there’s no automatic check for new messages (this is useful for those who want to save on the cost of data plans).

To enable Push Mail:

  1. Go to Settings, select Mail, Contacts, Calendars and tap on Fetch New Data.
  2. Turn on Push if it’s not on already.
  3. Tap on Advanced
  4. Select your Yahoo account and set the option to Push (or whatever method suits you).

That's it for setting up your Yahoo! Business Email on your iOS device!

Wednesday, March 28, 2012

Belkin Share Max N300 / N600 Wireless Router (F7D7301 / F7D8301) DD-WRT Flash Procedure

Update: The same firmware flashing process can be used on the Belkin Play HD N600 Wireless Router (F7D8301).

The Belkin Share Max N300 Wireless Router has very good hardware. However, the default firmware that comes with this router is quite unstable and has caused many people problems. This has generated quite a lot of negative reviews. For example:

Belkin Share Max N300 Wireless N Router


Fortunately, the hardware in this router is suppported by third-party firmware such as DD-WRT. With the DD-WRT firmware, the router runs much more stable and makes the router a more usable piece of equipment.

To flash (or load) the DD-WRT firmware to the router, you will need the following two
files:
dd-wrt.v24-15396_NEWD-2_K2.6_mini_f7d3301.bin
dd-wrt.v24-15396_NEWD-2_K2.6_mega.bin
Download and save the above two files first before proceeding.
  1. First, set your computer to the IP address of 192.168.2.8 and gateway of 192.168.2.1.
  2. Once your network settings are in place, plug your computer directly into one of the four LAN ports on the router and  browse to the router at 192.168.2.1.
  3. Do a factory reset to make sure all settings are cleared. For detailed instructions on how to do this, go to Belkin's support site at: http://en-us-support.belkin.com/app/answers/detail/a_id/6908.
  4. After the factory reset and the router reboots, proceed with a so called 30/30/30 reset, that is, hold the reset button down 30 seconds, unplug the power plug without letting go of the reset button for another 30 seconds, then plug the power back in while still holding the reset button and wait for yet another 30 seconds).
  5. Once the 30/30/30 reset is complete, refresh your browser and you should see the CFE miniWeb Server page like the following:
  6. Browse to the first file (dd-wrt.v24-15396_NEWD-2_K2.6_mini_f7d3301.bin) and click on Upload. It is important that this mini build is flashed first before going for the mega build or any other version. Going directly to any other builds might brick your router.
  7. After the file is uploaded, the router proceeds to reboot itself. This might take a long time so take a coffee break before going to the next step.
  8. Returning from your coffee break, make sure the router status light is a solid green and not flashing or blinking any other color. If so, take another coffee break before proceeding.
  9. The mini build should now be up and running on the router so set your IP address to 192.168.1.8 and gateway to 192.168.1.1 then browse to 192.168.1.1. You should see that indeed DD-WRT is now running and prompting you to change your password.
  10. After changing your password, go to Administration and select Firmware Upgrade.
  11. This time, browse to the mega build file (2nd one you've donwloaded  dd-wrt.v24-15396_NEWD-2_K2.6_mega.bin) and click on Upgrade. Notice this time there's a counter that counts down 5 minutes worth of time. Take a short break and do not interrupt the upgrade process.
  12. After a while, the browser should automatically redirect you back to the page that prompts you to change the password. If not, wait until the router status light is a solid green and browse to 192.168.1.1. You will notice under the Firmware version to the upper right hand corner of the screen that the build type is mega instead of mini now.
  13. Once you have changed your password, you are all set to go. Tweak the settings to your heart's content.


Wednesday, February 29, 2012

Firefox: An Unknown Error Occurred While Printing

Oh, the dreaded error message when you wanted to print a web page from Firefox in Windows! Often times, simply viewing the properties page of the active printer will fix the problem. If that doesn't work, restarting Firefox sometimes brings back the printing functionality. When all else fails, restarting the machine will do the trick. The problem is, when you want to print a web page that will no longer exist after you've restarted Firefox or the machine, for instance an order confirmation page. Here's a trick that usually fixed the printer error.

The trick involves restarting the Print Spooler service. But, simply restarting the Print Spooler service will not fix the problem all the time. The real trick lies in the extra step after stopping the service and before starting it again. Read on if you want to find out.


  1. Go to Start -> All Programs and right-click on Computer and select Manage. This will start the Computer Management application.
  2. In Computer Management, go to Computer Management -> Services and Applications and click on Services.
  3. Scroll down to find the Print Spooler Service. Right-click on Print Spooler and select Stop from the context menu.
  4. Now here's the trick, before starting the Print Spooler service again, go back to Firefox and click on the print button. Since the Print Spooler has stopped, Firefox will no longer be able to find any printers to print to, thus this action will generate an error in Firefox. Fortunately, this can be safely ignored because we already know that we had stopped all applications from seeing any printers by stopping the Print Spooler service. Simply click on the No button when you get the prompt to install printers.
  5. After dismissing the error message in Firefox, go back to Computer Management and right-click on Print Spooler again. Select Start from the context menu to put all printers back on service.

One of these tricks usually fixes the printer error in Firefox. If you are aware of other ways to fix this problem, you are more than welcome to contribute in the comments.