The Email app in Android is a good and free app that allows you to access Yahoo! Business Email. The only disadvantage of Android Mail is that it does not support push mail. So you’ll have to set it to check mail at a regular interval. To set up your Email app, you will need the following information (step-by-step direction will follow):
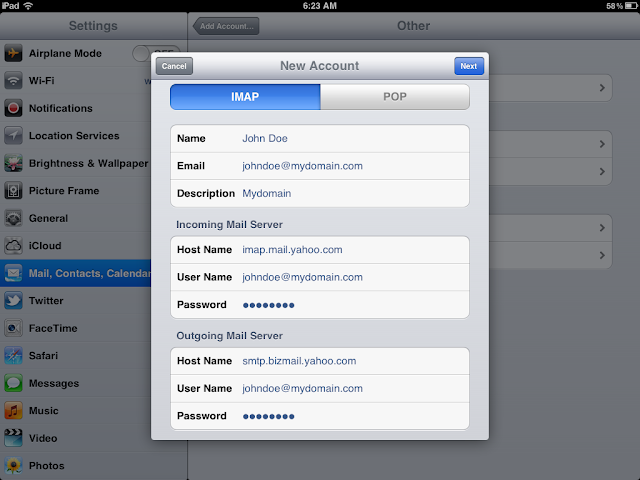
- Incoming Mail (also known as IMAP in technical terms):
- Server: imap.mail.yahoo.com
- Port: 993
- Security: SSL
- Outgoing Mail (also known as SMTP):
- Server: smtp.bizmail.yahoo.com
- Port: 465
- Security: SSL
- Tap on the menu button at the bottom of your screen.
- Tap on Email (the default Android Email, not any other email app like Gmail or Yahoo mail).
- Click the Menu button at the bottom of your phone (often it is a physical button outside of the screen on the very left hand side).
- Tap on Add Account.
- Select Others for account type.
- Enter your email address and password then tap on Manual Setup (DO NOT tap on Next).
- Select IMAP when prompted for account type.
- Enter the following information for Incoming server settings then tap Next:
- Username:(Your complete email account, including the domain name.)
- Password:(Your password)
- IMAP server: imap.mail.yahoo.com
- Port: 993
- Security type: SSL
- IMAP path prefix: (Leave this blank.)
- Enter the following information for Outgoing server settings then tap Next:
- SMTP server: smtp.bizmail.yahoo.com
- Port: 465
- Security type: SSL
- Require sign-in: checked
- Username: (Your complete email account, same as in the previous step.)
- Password: (Your password.)
- Under Email checking frequency, set it to how often you would like mail to be checked (it does not support push mail so you will not get messages immediately). Make sure the checkbox next to Notify me when email arrives is checked then tap on Next.
- Give the account a nickname and tap on Done.

